CPSC
481 Assignment 3:
VB Intro Stuff part 3
Note: November 10, 2000 - Problems should be fixed ... 3:09 PM
Note: November 10, 2000 - Having a couple issues with this example, it's not quite working right...
Note: Lots more example programs (including these) on the 481 website at:
Contents:
Download and Run Example Program 6
Okay, this is the promised ADO example program. It's exactly the same as the example I did for the Data Control and the FlexGrid, but with a few added bells and whistles. Also, it works right away with an Access 97 or 2000 database, which makes things much more convenient. Okay, let's get into this thing:
 |
Click here to download |
Okay, the steps to follow:
|
The project file for the cheap database program |
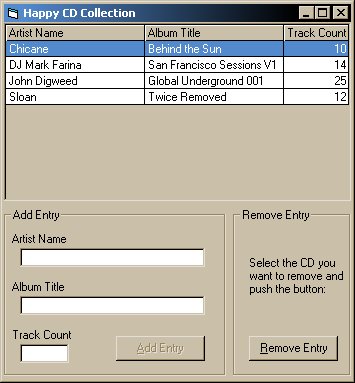
With that going, you can push the play button (center of the top tool bar) and see what it looks like. There are a couple of things you can do with it:

The new
improved CD Collector program window
Pretty amazing, eh? :)
Build Example Program 6 from Scratch:
Okay, let's get down and dirty. :) This one's quite a bit bigger than the other one (although the bigger is more or less useless stuff that was thrown in for fun, haha!).

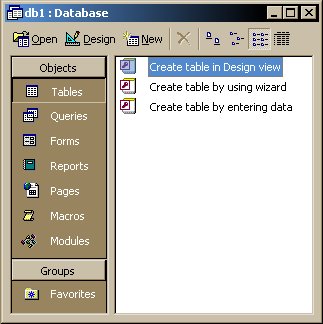
the database
design main window

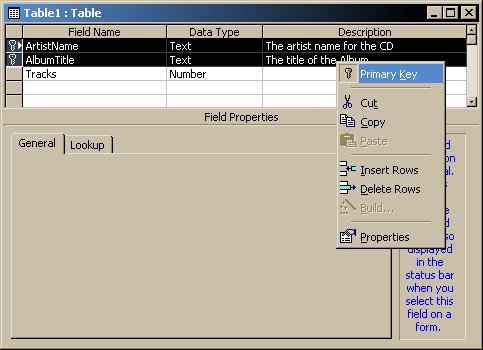
The table design
view window
Okay, as mentioned at the top of this article, we're going to use the ADO (ActiveX Data Objects) data control for getting at data instead of the common data control used in Example 3. I know what you're thinking: who cares. :) In any case, ADO can provide you with a little more customizability and a little bit more speed, but it's also a little more difficult to use. No problem, though, there's a cheap way around everything, so let's dive right in.

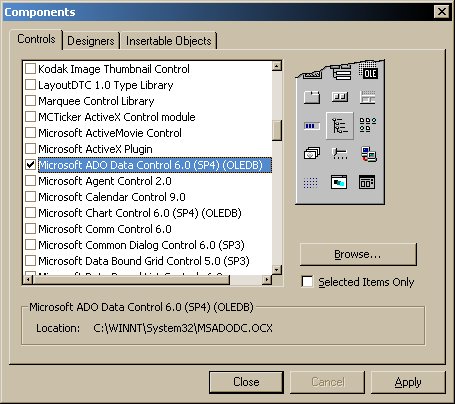
the add components
dialog
Option Explicit

' couple'o global vars to track the form minimum size
Dim MinHeight As Long
Dim MinWidth As Long

Private Sub Form_Load()
    ' set up the database connectivity for the ADO data control
    With Adodc1

        ' the connection string just defines an interface to connect
        ' to the Access database.  We use the MS Jet SQL drivers for
        ' simplicity's sake.  Side-note: you can build your own connection string
        ' from the property sheet for the ado data control, but I would advise
        ' against it, this is easier. :)
        .ConnectionString = "Provider=Microsoft.Jet.OLEDB.4.0;Data Source=" & _
            App.Path & "\CDCollection.mdb;Persist Security Info=False"

        ' the record source just tells the data control what and how
        ' to pull out of the database. Just raw SQL here.
        .RecordSource = "select * from CDs order by ArtistName"
    End With

    ' set the Flex Grid data source to be the ADO data control.
    Set MSHFlexGrid1.DataSource = Adodc1

    ' set up the format string for the flex grid.
    MSHFlexGrid1.FormatString = "Artist Name | Album Title | Track Count"

    ' position all the controls happily and store the form minimum size
    MinHeight = Form1.Height
    MinWidth = Form1.Width
    Call Form_Resize
End Sub
Private Sub Form_Resize()
    ' check to see if the form is getting too small (Note: this is just to avoid
    ' the math necessary to shrink all the textboxes, hahahaha!!)
    If MinHeight > Form1.Height Then
        Form1.Height = MinHeight
        Exit Sub
    ElseIf MinWidth > Form1.Width Then
        Form1.Width = MinWidth
        Exit Sub
    End If

    ' resize the flexgrid to fit nicely on the screen
    MSHFlexGrid1.Width = Form1.ScaleWidth
    MSHFlexGrid1.Height = Form1.ScaleHeight / 2

    ' resize the happy columns to look pretty (40% for each text column, 20% for Track)
    MSHFlexGrid1.ColWidth(0) = 0.4 * MSHFlexGrid1.Width
    MSHFlexGrid1.ColWidth(1) = MSHFlexGrid1.ColWidth(0)
    MSHFlexGrid1.ColWidth(2) = MSHFlexGrid1.Width - (MSHFlexGrid1.ColWidth(0) * 2) - 60

    ' reposition  and resize the frames on the screen to fit nicely (there was no
    ' science here, just did it by trial and error)
    fraAddEntry.Top = (Form1.ScaleHeight / 2) + 100
    fraAddEntry.Height = (Form1.ScaleHeight / 2) - 150
    fraAddEntry.Width = (Form1.ScaleWidth * 0.64)
    fraRemoveEntry.Height = (Form1.ScaleHeight / 2) - 150
    fraRemoveEntry.Top = (Form1.ScaleHeight / 2) + 100
    fraRemoveEntry.Width = (Form1.ScaleWidth * 0.36) - 100
    fraRemoveEntry.Left = fraAddEntry.Width + 100
End Sub
Private Sub cmdAddEntry_Click()
    ' add a new entry to our table.
    With Adodc1.Recordset
        .AddNew
        !ArtistName = txtArtistName
        !AlbumTitle = txtAlbumTitle
        !Tracks = txtTrackCount
        .Update
        .Requery
    End With

    ' refresh the data source and rebind it to the flexgrid (annoying!!)
    Adodc1.Refresh
    Set MSHFlexGrid1.DataSource = Adodc1
    MSHFlexGrid1.FormatString = "Artist Name | Album Title | Track Count"
    Call Form_Resize

    ' clear the text fields once the new record is added
    txtArtistName = ""
    txtAlbumTitle = ""
    txtTrackCount = ""

    ' set the focus back to the  artist name textbox
    txtArtistName.SetFocus
End Sub
Private Sub cmdRemoveEntry_Click()
    ' delete an entry from the database
    With Adodc1.Recordset
        .Move (MSHFlexGrid1.Row - 1) ' we minus one because row zero is the header row
        .Delete
        .Requery
    End With

    ' refresh the data source and rebind it to the flexgrid (annoying!!)
    Adodc1.Refresh
    Set MSHFlexGrid1.DataSource = Adodc1
    MSHFlexGrid1.FormatString = "Artist Name | Album Title | Track Count"
    Call Form_Resize

    ' set the focus back to the first add field
    txtArtistName.SetFocus
End Sub
Private Sub txtArtistName_Change()
    ' here, just check to see if each text field has contents.  If they all have
    ' contents (ie, they're not empty) enable the "Add Entry" button.
    If txtArtistName.Text <> "" And txtAlbumTitle.Text <> "" And txtTrackCount.Text <> "" Then
        cmdAddEntry.Enabled = True
    Else
        cmdAddEntry.Enabled = False
    End If
End Sub

Private Sub txtAlbumTitle_Change()
    ' just call the artist name change method because the code here would be
    ' exactly the same.
    Call txtArtistName_Change
End Sub

Private Sub txtTrackCount_Change()
    ' just call the artist name change method because the code here would be
    ' exactly the same.
    Call txtArtistName_Change
End Sub
Private Sub txtTrackCount_KeyPress(KeyAscii As Integer)
    ' TrackKey will store which key was pressed in an _ascii_ value.
    Dim TrackKey As String
    TrackKey = Chr(KeyAscii)

    ' if the key pressed was a)not a number and b) not the backspace key,
    ' just erase the keystroke (it won't get processed or sent)
    If (Not IsNumeric(TrackKey) And Not (KeyAscii = vbKeyBack)) Then
        KeyAscii = 0
    End If
End Sub
And that should be it!! Make sure you've saved your project in the same folder as you saved your Database from the above section, and you should be good to go running this thing.