CPSC
481 Assignment 3:
VB Intro Stuff part 2
Note: Lots more
example programs (including these) on the 481 website at:
Contents:
Download
and Run Example Program 3
This week, we do
a slightly more complicated example and make use of the MSFlexGrid Control to
interface with a database built in MS Access. It's a really cheap CD Collection
database so you can have a nice cheap computer list of all the CDs you own.
It's braindead. :) This is so easy and the code is so short, that's my only
note for now. :) Let's just jump right in on this thing by downloading it and
running it:
Okay, the steps
to follow:
- Just save
the file to your desktop.
- Double click
the file to open it with winzip.
-

The
project file for the cheap database program
|
Click "Extract"
and extract the file to your desktop (note: you need to extract both
files).
- On your desktop,
you should now have a folder called "flexample"
- Go in there
and double-click "Projcet1.vbp" (.vbp stands for "Visual Basic
Project")
- Now, you should
get VB loaded up with that project, no problem!
With that going,
you can push the play button (center of the top tool bar) and see what it looks
like. There are a couple of things you can do with it:
- You can add
CDs to the Database by entering some info in the textboxes and pushing the
"Add This Info" button
- You can select
a row from the grid and hit the "Remove Selected" button to remove
it permanently from the database
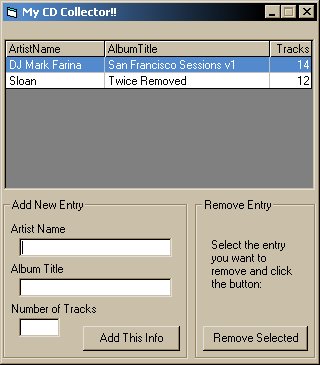
The Cheap
CD Collector program window
Pretty amazing,
eh? :)
Build
Example Program 3 From Scratch
Okay, already you
can tell that this one is a little more complicated to build ... but it's still
surprisingly simple to get a database application going. The only tricky part
of it is watching database versions.
This is just a
very simple, brain-dead database and app, so it's not meant to be sophisticated
or correct in terms of database design in any way!! The first thing you need
to do is just make yourself up a database table in Access and save it to an
mdb file. Sooooooo simple:
The
Database Design
- Open up MS Access
(Start - Programs - Microsoft Access)
- Pick "Start
a blank database" from the wizard that pops up
- Pick a spot
to save the mdb file and a name for it (mine was "CDCollectionA.mdb")
- You'll get to
the following window, where you double click on "Create a table in design
view:"
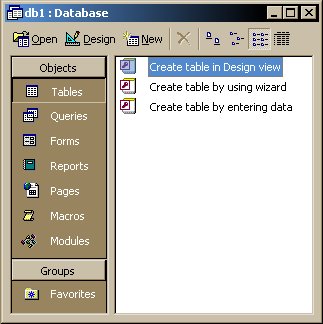
the database
design main window
- When you double
click that "create table in design view" thingie, you get to this
window:
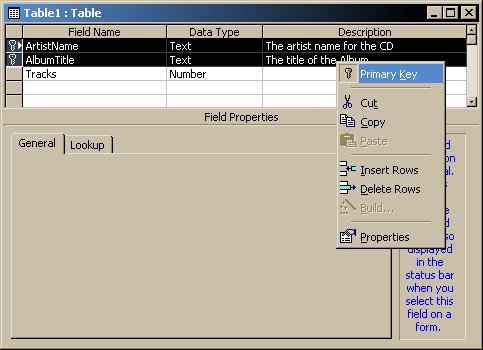
The table design
view window
- You want to
follow the following steps to get the table I was working with:
- Make a field
called ArtistName whose type is Text
- Make a field
called AlbumTitle whose type is Text
- Make a field
called Tracks whose type is Number (just a long integer
is cool enough)
- Select the
rows in the design view (as pictured above) that have ArtistName
and AlbumTitle
- Right-click
on that selection, and pick Primary Key from the menu you get.
This will make both fields into primary keys. The idea is that they can
be primary because you'll never have identical artist names and album
titles (otherwise what's the point?!).
- Once you've
got your table built, just close that window. You'll be automatically prompted
to save changes to the table design and to give the table a name. I picked
CDs, how original. :)
- Once that's
all done, you can either add a couple entries to the database by double clicking
the CDs table from the database design main window and inputting them manually
or just move on to:
- Export the database
to Access '97 (this is the annoying part of the whole thing) Here's what you
do:
- Go to the
Tools menu
- Select Database
Utilities
- Select Convert
Database
- Select To
Prior Access Database Version
- You'll get
a save file dialog that will let you enter a name for your database. (I
used "CDCollection.mdb") Just save it in the same folder
as your Access 2000 version of the file. Whatever you call it, make sure
you keep track of which database file is which version!!
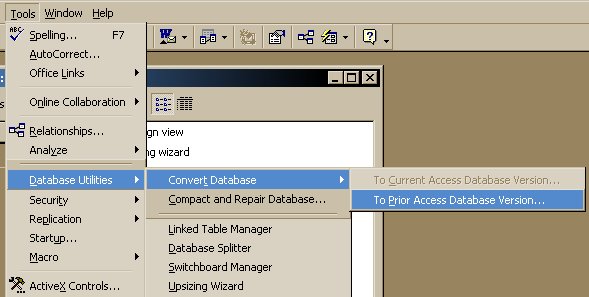
Export your database
to a prior Access Database Version
The
Software Design
Okay,
now you've got the database file, and remember where you saved that mdb file
at the start of the process. That's where you'll save your vb project too, just
to keep things simple. You'll probably eventually want your program and data
living in the same folder for simplicity's sake, so it makes sense to just start
out like that. Okay, let's build this app:
- Start up VB
- Pick Standard
EXE from the new project list
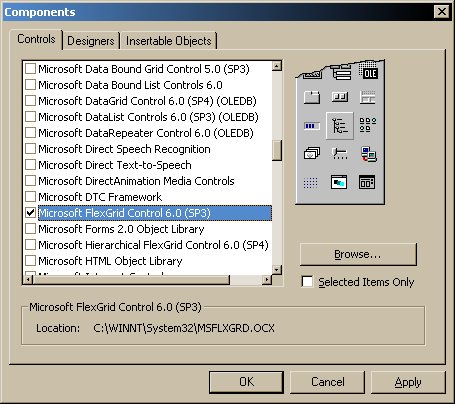
- Add the MSFlexGrid
control to your project:
- Go to the
Project menu, pick Components.
- Scroll down
the list of components until you find "Microsoft FlexGrid Control
6.0 (sp3)". Select that checkbox and hit the OK button to add
the control to your project.
- Add a FlexGrid
to your form by picking the
 tool and drawing it on your main form.
- Add a data source
to the form using the
 tool and drawing on the form. Change its visibility property to False.
- Add two frames
to the form using the
 tool and drawing them on the form.
- Change the caption
of one to Add new entry and the caption of the other to Remove
Entry
- Draw the following
controls in the Add new entry frame (yes, actually in the frame):
- A text box
with the (name) txtArtistName
- A label
above that text box with the caption Artist Name
- A text box
with the (name) txtAlbumTitle
- A label
above that text box with the caption Album Title
- A text box
with the (name) txtTrackCount
- A label
above that text box with the caption Number of Tracks
- A command
button with the (name) cmdAddEntry and the caption Add
this info
- Now, to the
Remove Entry frame, add the following controls:
- A command
button with the (name) cmdRemoveEntry and the caption
Remove Selected
- A label
with the caption Select the entry you want to remove and click
the button:
- Now, the most
complicated part is formatting the FlexGrid (which is called MSFlexGrid1)
to do what you want. It's fairly customizable, but here's all I did for this
example program:
- the AllowUserResizing
property was set to 1
- the Cols
property was set to 3
- the DataSource
property was set to Data1 (** this is required **) this
hooks the data source up to the FlexGrid.
- the FixedCols
property was set to 0 while the FixedRows property was set to 1.
(this is recommended)
- the FocusRect
property was set to 0.
- the HighLight
property was set to 1.
- the ScrollTrack
property was set to True.
- the SelectionMode
property was set to 1 (selection by row only).
- the WordWrap
property was set to True.
- Okay, next the
code. In the form design window, double click the form, which should bring
up the code window with a blank Form_Load() subroutine. Here's the
code for it:
 Private Sub Form_Load()
    'the format string just lets you define a format for how
    'your flexgrid will appear
    MSFlexGrid1.FormatString = "Artist Name             |" & _
        "Album Name                                 | Tracks"

    'make sure the search path to the db is always in the right spot
    Data1.DatabaseName = App.Path & "\CDCollection.mdb"

    'set up the recordsource for the datasource and flexgrid control
    'in this case, it's just a raw SQL query, simple simple.
    Data1.RecordSource = "select * from CDs order by ArtistName"
 End Sub
- Now, go back
to the form design window and double click the Add this info button.
You should now have a blank cmdAddEntry_Click() subroutine. Here's
what to fill in there:
 Private Sub cmdAddEntry_Click()
    'add a new entry to our table.
    With Data1.Recordset
        .AddNew
        !ArtistName = txtArtistName
        !AlbumTitle = txtAlbumTitle
        !Tracks = txtTrackCount
        .Update
    End With
    Data1.Refresh

    'clear the text fields once the new record is added
    txtArtistName = ""
    txtAlbumTitle = ""
    txtTrackCount = ""
 End Sub
- Last thing you
need is the remove code. In the form design window, double-click the Remove
Selected button. You should get a shell for the cmdRemoveEntry_Click()
subroutine. This is the code:
 Private Sub cmdRemoveEntry_Click()
    'delete an entry from the database
    With Data1.Recordset
        .Move (MSFlexGrid1.Row - 1) ' we minus one because row zero is the header row
        .Delete
    End With
    Data1.Refresh

    'set the focus back to the first add field
    txtArtistName.SetFocus
 End Sub
- And we are done!
It's actually pretty simple to do this stuff, no problem!! Before you run
this thing, you will need to save the project to the same folder that you
saved your database file from the above section to.
Download
and Run Example Program 4
Example programs
4 and 5 were both written by Saul and have the basic goal of teaching some more
about event handling in VB as well as teaching a little bit about how to go
about using a canvas-style widget. Without further adue, let's check out the
first simple example:
Okay, the steps
to follow:
- Just save
the file to your desktop.
- Double click
the file to open it with winzip.
-

The
project file for the simple sketchpad program
|
Click "Extract"
and extract the file to your desktop (note: you need to extract both
files).
- On your desktop,
you should now have a folder called "Sketchpad1"
- Go in there
and double-click "Sketch1.vbp" (.vbp stands for "Visual Basic
Project")
- Now, you should
get VB loaded up with that project, no problem!
With that going,
you can push the play button (center of the top tool bar) and see what it looks
like. Theres only one thing you can do with this one!!:
- Click and hold
the mouse on the canvas and roll it around to draw a cute blue line
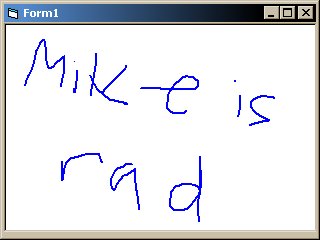
the sketchpad
form in action (yes I'm rad)
Build
Example Program 4 from Scratch
Okay, let's actually get to work building this thing. This one is actually
quite simple to build and shouldn't take too long at all!! Check it out:
- Start up VB
with a Standard EXE project (this should be familiar terminology to you by
now).
- Add a picturebox
to the main form using the
 tool and drawing on the form. Just make it mostly the same size as the entire
form. :)
tool and drawing on the form. Just make it mostly the same size as the entire
form. :)
- Change the picturebox's
(name) property to read picCanvas.
- Now double-click
on the form (not on the picturebox) to get access to a shell for the Form_Load()
subroutine. The code for that looks like:
 Private Sub Form_Load()
    'Redraws the image  when the window is covered/uncovered
    picCanvas.AutoRedraw = True

    'The canvas look and drawing behaviour
    picCanvas.DrawWidth = 2 'Lines are 2 units thick
    picCanvas.ForeColor = vbBlue 'Lines are blue
    picCanvas.BackColor = vbWhite 'Background canvas is white
 End Sub
- If you go back
to the form-design window and double click on the picturebox now, you'll get
a shell for cmdCanvas_Click(). That's not the one you want. From the
dropdown list on the top of the code window, pick the MouseDown event.
Here's the code to fill that one in:
 'Set the first point and start the line
 Private Sub picCanvas_MouseDown(Button As Integer, Shift As Integer, X As Single, Y As Single)
    If Button = 1 Then
        picCanvas.Line (X, Y)-(X, Y)
    End If
 End Sub
- Once that's filled in, from the same event drop-down list at the top of
the code window, pick the MouseMove event. The code for that bad boy
is right here for the taking:
 'Continue the line to the next point as we move the mouse
 Private Sub picCanvas_MouseMove(Button As Integer, Shift As Integer, X As Single, Y As Single)
    If Button = 1 Then
        picCanvas.Line -(X, Y)
    End If
 End Sub
That
should be it! This is pretty simple, all it does is listen for a button click
with the left mouse button on the picturebox. If it gets a mousedown followed
by a drag, it draws a blue line (as was set up in the form_load subroutine).
Simple use of events makes a fun little app!!
Download
and Run Example Program 5
Example
program 5 (also written by Saul) is an extention of the idea presented by Example
program 4. It has the same basic concept with a ton of more features! I
won't go through how to build it here, but leave it to you to download this
sucker and play around with it, because you can do some pretty neat things pretty
easily.
- Fun challenge:
try to implement a feature that would let you save whatever you draw in the
canvas to a bitmap or jpg file!
Okay, the steps
to follow:
- Just save
the file to your desktop.
- Double click
the file to open it with winzip.
-

The
project file for the extended sketchpad program
|
Click "Extract"
and extract the file to your desktop (note: you need to extract both
files).
- On your desktop,
you should now have a folder called "Sketchpad2"
- Go in there
and double-click "Sketch2.vbp" (.vbp stands for "Visual Basic
Project")
- Now, you should
get VB loaded up with that project, no problem!
With that going,
you can push the play button (center of the top tool bar) and see what it looks
like. There's tons of stuff you can do with this one:
- You can draw
a line on the canvas
- you can change
the colour of the line you draw on the canvas
- you can change
the thickness of the line you draw on the canvas
- you can clear
your canvas and start from scratch (although witha picture like this, why
would you clear it??? :))
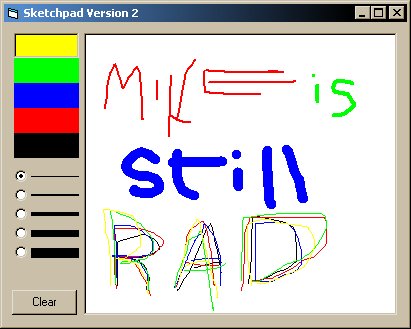
the hip sketchpad
main form ... I'm still rad!!
Suggestion:
check out the code for this bad boy and play around with modifying it. There's
a ton here and so there's tons to go from!!!
back
to the top!!


